
Conceptboard users love the fact that all information can be seen from a bird’s eye view, but at the same time, can focus in on the details. It is practical to use the expansive board space to create large quantity of content in one board, keeping all relevant information together. At times though, it can feel a little overwhelming to sift through all that information. Classic case of information overlad.
You have to make sure your audience does not fall into the trap of “information overload” when signing into your boards! Although there are many different solutions for conquering this, while working in your boards, we suggest structuring your boards with layers in mind.
Layer 1: An overview of all information
When working in a board, remember to structure the board and add visual markers so that it makes sense when you’re completely zoomed out. If someone enters your board for the very first time and sees only the overview of your board, at a 5 to 20% focus, they should be able to get some useful information from it.
Adding sections to your boards will make it easier to group relative content together and keep it contextual. Instead of arranging your sections into a vertical line, where it is more difficult to connect all information, arrange your sections in a grid or in long rows to avoid information overload. This can help to visually show iterative cycles or versions within the same board.
Adding more details to your overview to avoid information overload
Does your team have a common color code they use? Make sure to bring that into the boards because this also helps to prevent information overload. Color code your sections or textboxes to further connect ideas together. You can include a small legend explaining what each section background colors mean in the board. For example, pick two contrasting colors to show a strong visual separation between two points.

You can also choose different colors depicting the process of your workflow and actions that need to take place. Here is the most commonly used color coding system:
- Red: needs to be taken care of right away. The team cannot do anything further until details are updated.
- Yellow/Orange: needs to be updated but without a sense of urgency. The project will continue to develop without having all the details fixed. But it is still necessary to update them in the long run.
- Green: only deals with cosmetics updates or simple UI improvements.
- Blue: all collected data that needs to be available for reference throughout the project.
The idea is that by color coding your sections, you add an extra layer of visual information that allows your team to quickly orient themselves in the board and find the necessary information.
Depending on the size of you boards, you can add headlines to each of your sections. Headlines will automatically be in 36 size font, but you can also change the font to make it bigger. This way, your audience will be able to see the main subject line for each section without having to take a closer look.
Layer 2: Zooming into the details
Now that your audience has had a quick overview look at your entire board and understand the general information, it’s time to dive into the details. When your audience zooms into a 25-50% view point, they will be able to see the sections individually. With a few clicks of their mouse, they should get the basis of each section without having information overload.
To help with information overload, make all text boxes laying on top of your content visually stand out. Remember what we said last week and give enough visual space between each text box to not overcrowd your boards. Separating your text in several individual text boxes will make it easier for others to read. Also, keep in mind the font size that you use, so the font is not too small that your audience would need to zoom completely in to see it.
When you have multiple pieces of information and feedback that relates to a larger area of the section, make sure to section it out to have more space. Use the arrow tool or a rectangle tool to connect the sectioned out content to the original point to avoid information overload.
Layer 3: Diving even deeper
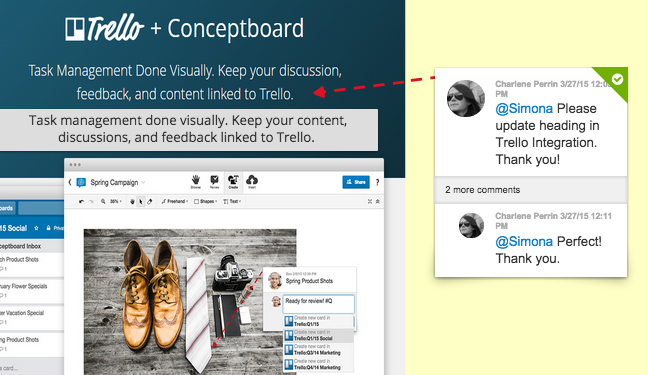
Most of the time you’ll be working between 80 and 100% zoom. This is where commenting and giving feedback directly on your content happens. There are best practices you can use on this 3rd visual level too.
Using the comment tool pointing the arrow head directly to a specific part of your content is very useful in this layer. Don’t forget to @mention your teammates and to assign tasks to keep your workflow going. Remember, long conversations can easily be collapsed to show only the first and last comment.
When creating your board, always think about how you can help your audience interpret and find all relevant information easily. Not only is keeping organization throughout your boards important, but also the way you lay out your information needs to be properly thought over. Information overload will happen if your audience looks at your entire board at a 100% zoom. So make sure to use the correct Conceptboard tools to help them understand all ideas and concepts in your boards.

4 Comments. Leave new
I am trying to be more positive, so I appreciate your example. Thank you for sending out such good energy into the world! All my best to you.
Thank you so much for enjoying our article.
“Thanks designed for sharing such a pleasant thought,
paragraph is fastidious, thats why i have read it entirely”
Might be almost not possible to encounter well-educated individual on this issue, then again you appear like you know those things you’re raving about! Thanks A Lot